Let’s Build a Snowman

Last week I admitted I have an obsession with snowmen (here). Living in Florida we will not be building any snowmen any time soon, but many of you are living in snow-covered areas. When I saw “Build a Snowman Kit” on Pinterest I knew I had to make one. Thankfully, my sister lives in an area that does get snow.

Build a snowman
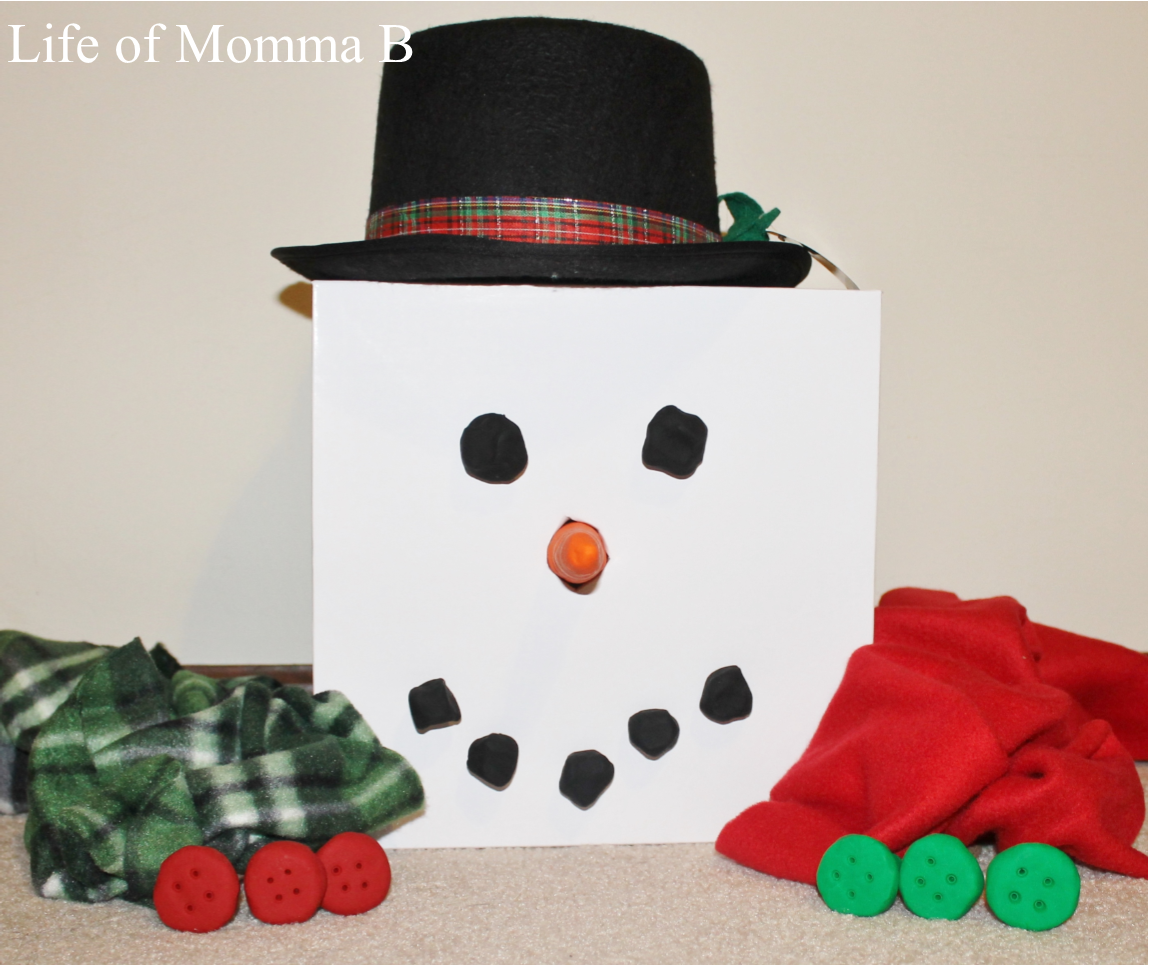
(Please excuse the box “snowman head”, Florida does not get much snow).

The kit was easy to make but I could not get the words to “Frosty the Snowman” out of my head. Corn-cob pipes are not politically correct but I did keep the eyes made out of coal. I guess the buttons could also be for a nose, but I think the carrot is more traditional. I included two scarves and two sets of buttons to allow for some variety. Continue reading “Let’s Build a Snowman”

My Snowman Obsession

Hello, my name is Rebecca, and I have an obsession with snowmen.

I find snowmen to be soooo cute. During the winter holidays my house is full of these whimsical characters. This year I found a way to add another one to the bathroom.

The way I calculate it the project was practically free. I always need soap in the bathrooms, so I would have bought it anyway, and I had the paint and brushes on hand from another project.

Snowman soap

I began with a bottle of white hand soap (well 2 actually).

Step one – remove the label. I have found that rubbing alcohol helps to remove the sticky residue that is left.

Step two – use acrylic paint to create a super cute face. A Q-tip works great for the dots.

Step three – when the paint is dry, wash your hands.

I loved how they turned out. I put one by my kitchen and the other one in the kids bathroom. The soap is now almost gone (I’m a little behind in posting my projects) but the face is still there.  These will be making another appearance at my home next December.

If you decide to make these, I would love to see some pictures.

DIY Welcome Mat

As we welcome in the new year, let me welcome you into my home. Door mat

Do you realize that your front door makes a big impression on your house? Just like they say, the first impression is a lasting impression. A door mat is part of that first impression. In preparing for a new house, I also wanted a new doormat. Out with the old dirty one and in with a personalized one. But like always, price is a factor. Monogrammed doormats can be found on Amazon for $25 and more (some were over $100 – ridiculous). I was determined to find a less expensive alternative – enter another DIY project. For less than $6 (including tax) and some supplies I had on hand I now have a new doormat.

 diy Welcome Mat

I began with a plain doormat I found at IKEA for $4.99 and add some supplies I had on hand (a foam brush, acrylic paint, and some vinyl). Not pictured above is a smaller paint brush to help get into the crevices of the mat.

I used my trusty Cricut to cut a large letter B. I discarded the letter and kept the stencil. I applied the vinyl to the mat, being certain to a make sure it stuck to as many points on the woven mat as possible.

Next, I applied a coat of outdoor acrylic paint over the stencil with a foam brush. At this point I realized that the paint was sitting on the top of the mat at the high points and not getting in between the fibers very well, so I used a smaller brush. While the paint was still wet, I removed the stencil and touched up any spots that were missed.

All that was left was to let it dry and set it out at the new house.

Zebra Bowl

In preparation for our move I am preparing to redecorate the kids bedrooms. Lily has decided she wants a purple zebra room. My first little project for her room was a bowl for her to put little things in such as coins, jewelry or any of the little things she does not want to lose.

It all began with a miniature ceramic dish I picked up at the dollar store. I have seen many projects on Pinterest that used a Sharpie to decorate dishes. After some research, I noticed that there were many complaints that the item did not stand up to being washed in the dishwasher. Since that was not an issue I decided to continue.

Using a fine marker I drew a zebra pattern in the bottom of the dish and then baked it at 375* for 45 minutes. I allowed it to cool overnight in the oven.  The next morning I hand washed it. Lily loves it!

Zebra bowl


The great water bottle solution

As a mother of two active children, we are forever losing water bottles. Looking in the lost and found box is useless, for they all look alike. While getting ready for camp this past year I was determined to be not lose another one.

water-bottle

It began with a bottle I found at the dollar tree (if it did get lost, at least I would not be out money too). Then, I used my Cricut to cut vinyl letters that I then placed on the bottle. It was a very easy project and took very little time to complete.

I was a little reluctant to post this at first, for I wanted to make sure that it would last more than a week. Well, here it is 6 months later and all is well. It not only came home from camp, the letters have remained in place after several washings.

I can not be more pleased. I might have to make a few of these for gifts this Christmas.