Gathered headband

My last couple of knitting projects has been gifts for other people, so I wanted to make something for my daughter that could be completed quickly. I found this basic headband here. I took basic idea and made it my own.

gathered headband

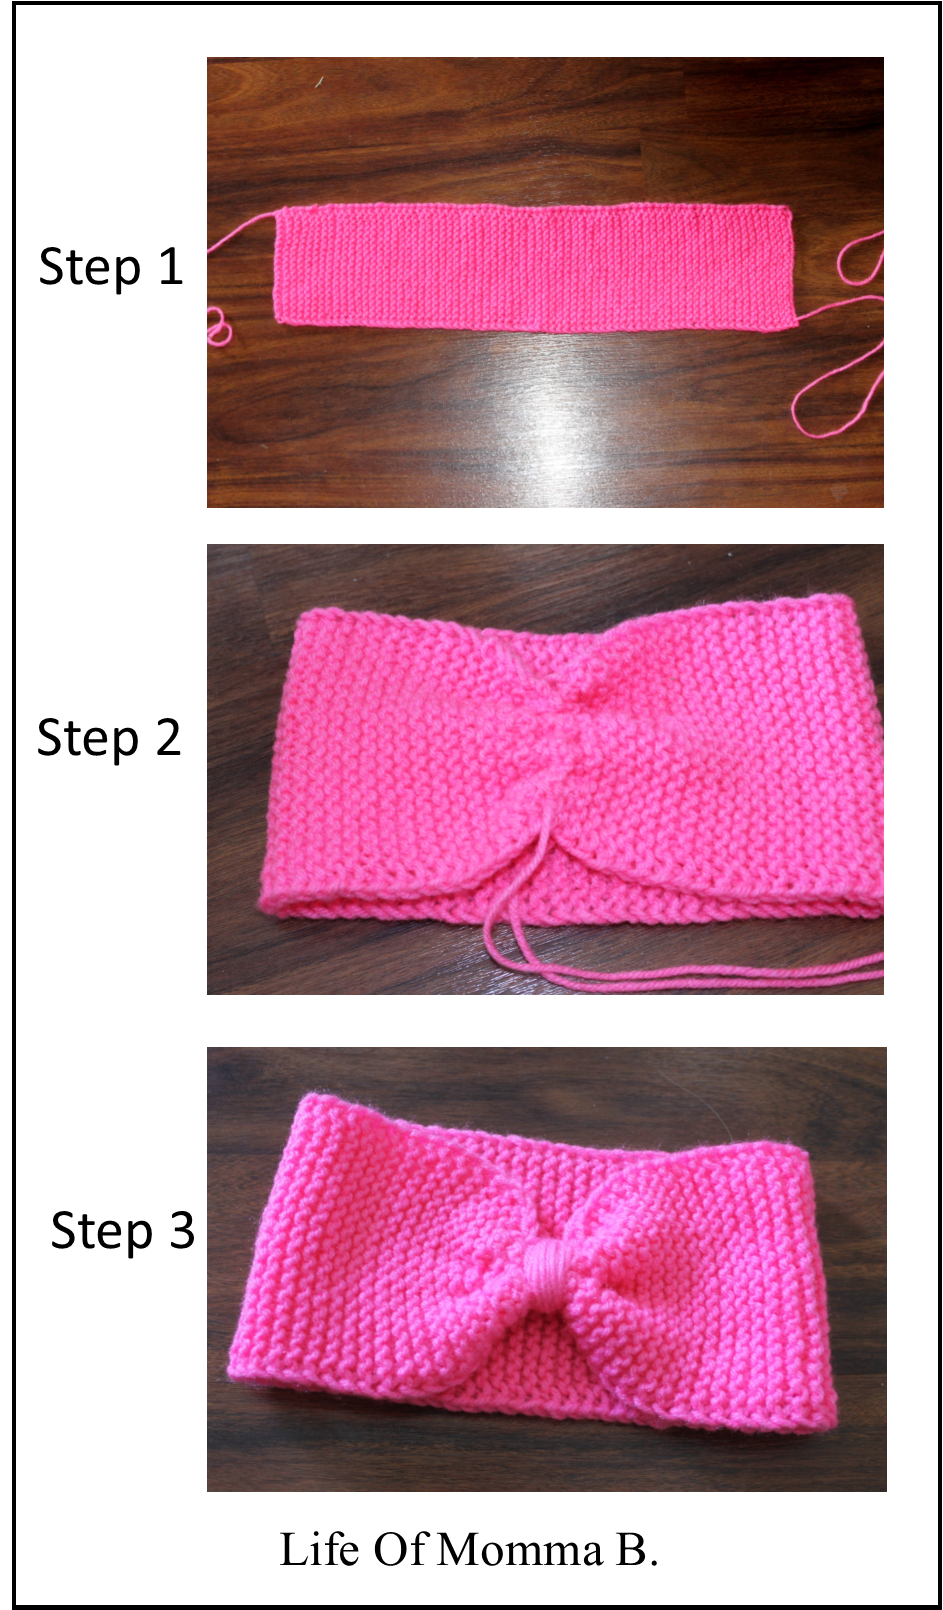
As I said this was supper easy and can be explained best in 3 steps.

STEP 1: Use size 8 needles, I cast on 20 stitches using a long-tail cast on. I used a simple garter stitch until I reached 18 inches. To create a nice edge I slipped the first stitch in each row purlwise. When you reach 18 inches be sure that you have knitted an even number of rows so when you cast off your tails are opposite each other. Then cast off as usual but leave a long tail.

STEP 2: Use one of your tails to join the cast on and cast off edge. Then pull gently until it gathers in the center. This will put both tails on the same side of the project.

STEP 3: Hold the two tails together and wrap the section that you have gathered until you have covered the center. On the back of the headband tie off the tails.

gathered headband step by step

Guacamole

One of my favorite sides with Mexican food is guacamole. It seems that everyone has their own take on the matter, I prefer mine smooth and creamy. My aunt gave me her recipe that is so easy my children make it, and have made it by themselves for several years.

guacamole

Guacamole is made with 4 simple ingredients, avocado, lemon juice, garlic salt and onion powder. Here is the recipe card for you to print Guacamole. 

GUACAMOLE
1 large ripe avocado
1   1/2 t lemon juice
1/4 t garlic salt
1/2 t onion powder
Combine all ingredients in a small bowl and mash with a fork until smooth.

Being a frugal person, I do not purchase garlic salt but make my own. To make garlic salt combine 1 part garlic powder with 2 parts table salt. I store the mixture in an old spice jar and use it when ever a recipe calls for garlic salt.

The great water bottle solution

As a mother of two active children, we are forever losing water bottles. Looking in the lost and found box is useless, for they all look alike. While getting ready for camp this past year I was determined to be not lose another one.

water-bottle

It began with a bottle I found at the dollar tree (if it did get lost, at least I would not be out money too). Then, I used my Cricut to cut vinyl letters that I then placed on the bottle. It was a very easy project and took very little time to complete.

I was a little reluctant to post this at first, for I wanted to make sure that it would last more than a week. Well, here it is 6 months later and all is well. It not only came home from camp, the letters have remained in place after several washings.

I can not be more pleased. I might have to make a few of these for gifts this Christmas.

Slow-Cooker Chicken Stock

If I were to tell you that you could make chicken stock in the slow-cooker while you sleep with ingredients that would usually be tossed in the trash, would you try it?  Well, that is what I am doing today!

chicken stock

In my freezer you can find a bag of chicken bones and scraps ready to make stock when I get enough, then it hit me – use the left over rotisserie chicken carcass and stop saving bits and pieces and never having enough when you need it. When I buy a chicken, I cut the meat off and serve it to the family (no eating drum-sticks for my kids). Then I put the pieces in my slow-cooker with 1 Tablespoon of balsamic vinegar and 8 cups of water. Turn it on high and 8 hours later drain the broth and there you go.

If you do not have balsamic vinegar, apple cider vinegar also works well. The vinegar helps to break down the bones so it releases the nutrients.

As always, feel free to print the recipe card and add it to your collection.   Chicken stock Recipe Card

A different ribbed hat

In between celebrating my birthday and getting ready to move to Florida, my needles have been busy clicking away.

Different ribbed hat

I found this pattern with the help of Pinterest. The full pattern can be found here. 

I made this hat (along with a scarf and headband) from a skein of Red Hear Super Saver turquoise acrylic yarn. Unlike a traditional ribbed brim were the rows line up vertically, these are staggered to create a diagonal pattern. I am pleased with the overall look of the hat. However it was a little larger than I had hoped. I made the adult small for my 10-year-old niece’s birthday. While it should fit (based on my daughter’s head) it was not overly snug. If I make this hat again I will use a smaller gauge needle and/or decrease the number of stitches.