RBD Block Challenge: Block 4, Framed Star

The RBD Block Challenge continues.   As I see it, the purpose of this type of challenge is 1) help you improve your skills,  2) introduce you to different pattern designers and 3) allow you to create a stunning quilt that is broken down into bite size pieces.   

This weekend I completed the fourth block in the series, the Framed Star, designed by Fran of Cotton and Joy. I have to admit that I am not very familiar with her work so I spent a little time checking her out.  If only my kiddos were little I would definitely be making the Annabelle quilt, and I still might because it looks so fun.  If you are not familiar with her work head to her website and check it out.  

In addition to completing this most recent block,  I was also able to begin cutting the fabric for all of the remaining blocks.  At the request of many of the participants, Riley Blake has now released the complete cutting instructions for the quilt.  This allows me to cut the fabric more efficiently.  All the information can be found here

Her Quilt of Many Colors

January has come and gone, and I realized I did not share with you the quilts I made for Christmas. Before I tell you about them, let me take just a moment to freak out…  NOOOOOOOO!!! …  OK, sorry about that,  I’m back and ready to share the first quilt I completed for Christmas 2023.

I began with a Beyond Basics jelly roll. This fabric line was designed by Annie Brady and manufactured by Moda.  The jelly roll contains 30 different colors,  so there were some duplicates.  But, it did give me a lot of variety. I also set aside the browns, blacks, whites and grays for another project.   

So many of the patterns I found would not allow the fabric to shine.  After countless hours of searching I found the perfect pattern on the Robert Kauffman Fabrics websiteAnd the best part, it was a free pattern.   Since I didn’t have enough strips, I did have to adjust the pattern a little bit. 

It came together fairly quickly.  I used my walking foot to quilt slightly wavy lines diagonally across it. It finished as a decent size lap quilt.  Sorry I forgot to measure it.   I hope you like it as much as my niece did. 

I can see using this pattern again,  so I will be keeping it in the files. You can get a copy of the original pattern here

Take life one stitch at a time,
Momma B

RBD Block Challenge: Block 3, Daylesford

I am all caught up with the RBD Block Challenge, and have completed the first three blocks.  Each Tuesday, except the last week of the month, Riley Blake Designs releases another block in their 2024 Block Challenge.  And I must say, this block was a challenge!

The Daylesford block was designed by Amy Smart from Diary of a Quilter.  It is a variation of the traditional eight-pointed star block with a pinwheel in the center. Lots of little pieces, but it is really just joining half-square triangles and flying geese.  For some reason, I struggled with this block. It just was not my day, and I had to use my seam ripper more than once.  

That brings me to the tip of the day… Seam rippers become dull and should be replaced periodically.  I frequently hear expert quilt teachers reminding us to replace the blade on our rotary cutters, but they don’t tell us to replace our seam rippers.  Just like any blade, it will become dull with use.  A dull seam ripper requires more force to cut treads, and you have an increased risk of cutting your fabric by mistake.  Seam rippers are inexpensive, do yourself a favor and buy a new one.  You will likely be surprised when you realize just how dull your blade is.  

If you are just joining me on the 2024 RBD Block Challenge, check out my first post (here). All the details about this free quilt along are included.  

Until next time, take life one stitch at a time.

Momma B

RBD Block Challenge: Block 2

Block 2 is completed, This block, Sparkle and Shine, was designed by Beverly McCollough of Flamingo Toes.  

I love the block pattern.  Like the previous block it uses half square triangles and stitch and flip corners.  It’s all about the right combination of pieces to create a stunning block.  Not to brag but I feel I did a decent job of matching all the points.  

However, the one thing I dislike is the colors in the center of the block.  I am considering re-doing this block with a different color combination. But, I think I will wait to the end and make sure there is enough fabric.  One thing about this quilt along is even though they tell you how much fabric you need, they do not give cutting instructions.  This means I am not able to cut the fabric efficiently, I would hate to run short.  

The pattern for block 3 was released this week.  I am already running behind on the quilt-along, but since there will not be a block the last week of the month, I will be able to catch up. 

Until next time, I’ll be taking it one stitch at a time.

Momma B

RBD Block Challenge: Block 1

Block 1 of the RBD Block Challenge has been released and it is by no other than Lori Holt. This block, Vintage Delight, features multiple stich-and-flip units that are joined together to form one cohesive block.  

If you are not familiar with Lori Holt, she is an amazing designer that has a flair for taking vintage patterns and making them new again. Check out her newest pattern, Mercantile Sampler, where she places traditional blocks inside circles giving them a new look.  She is the designer behind many of the quilt alongs hosted by the Fat Quarter Shop. In addition to being a fabric and pattern designer she also creates cross stitch patterns that coordinate with her quilts and is an avid crocheter. I am especially looking forward to her upcoming Christmas pattern that will be released this summer featuring Christmas baubles. While she does have a blog, I follow her on YouTube.  

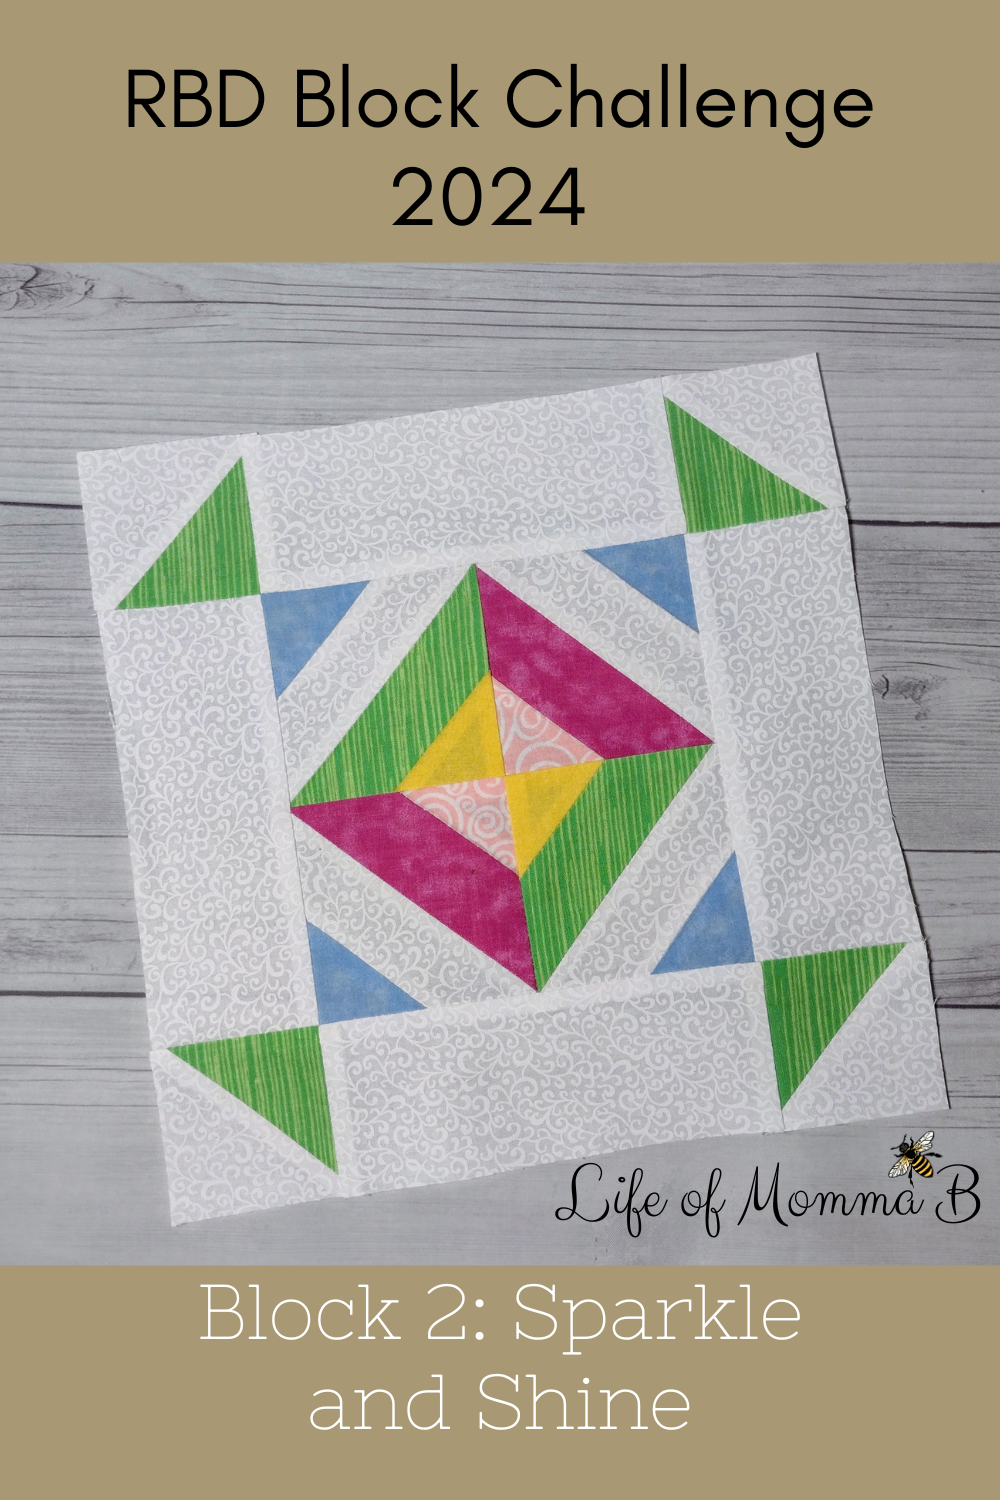
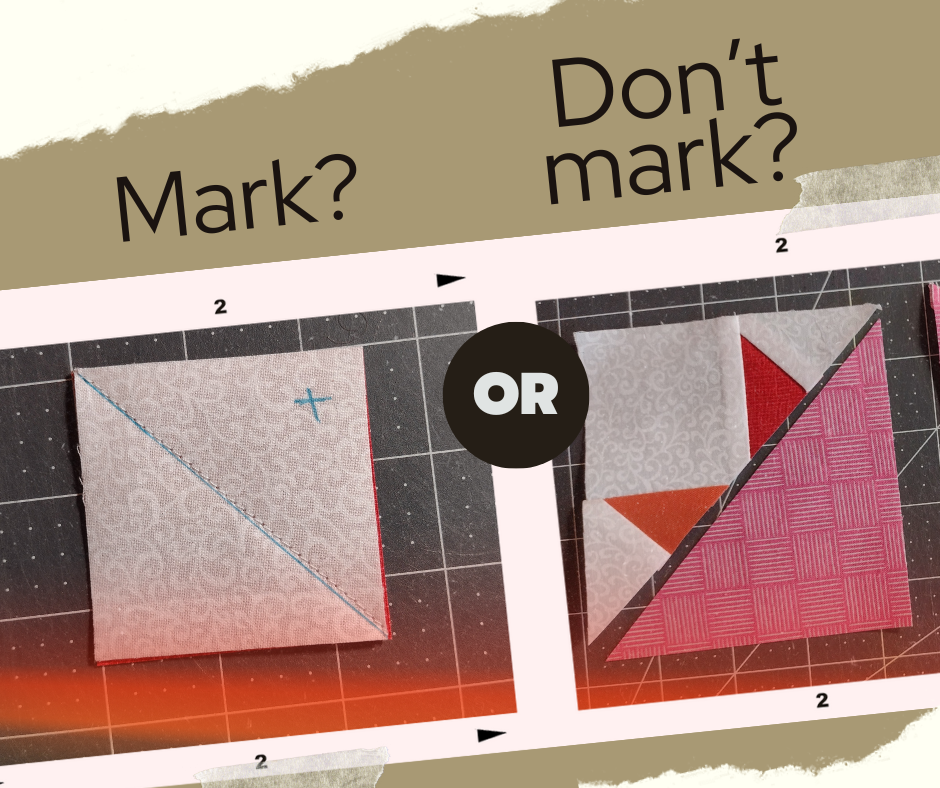
Back to the block at hand and stitch-and-flip blocks. These are not very hard to create and are often used when you want to cover only a corner of a larger block, like when creating snowballs. They can also be used to create flying geese. After the pieces are sewn together, usually on a diagonal, the excess is cut off, and the seam is flipped open to cover the part that was removed. 

Like the old adage of do as I say not as I do. You can save yourself a lot of time and heartache by marking the part you will cut and discard. In addition to marking the diagonal sew line on the back of the fabric, placing a small X on the waste side makes it easier. This is something I usually do, but in a moment of over confidence, I opted not to and cut on the wrong side of the sewing line. As you can see below there is no way to fix this mistake and I had to redo one corner of the block.  You can bet I marked it the second time through. So, do as I say not as I do. and mark the waste before you cut. 

If you missed the beginning of this series, click here to go to the introduction and a link to get all of the patterns in this series. While I wait for next weeks block to be released, maybe I can tackle some of my overdue projects from my UFO list. Here’s to taking life one stitch at a time.

Momma B